Monday, April 15, 2024

T Stands For Kitties In Crockery


Everything here has been recycled or repurposed.  

Bleubeard and I call this Kitties in Crockery.  Detail shot below:


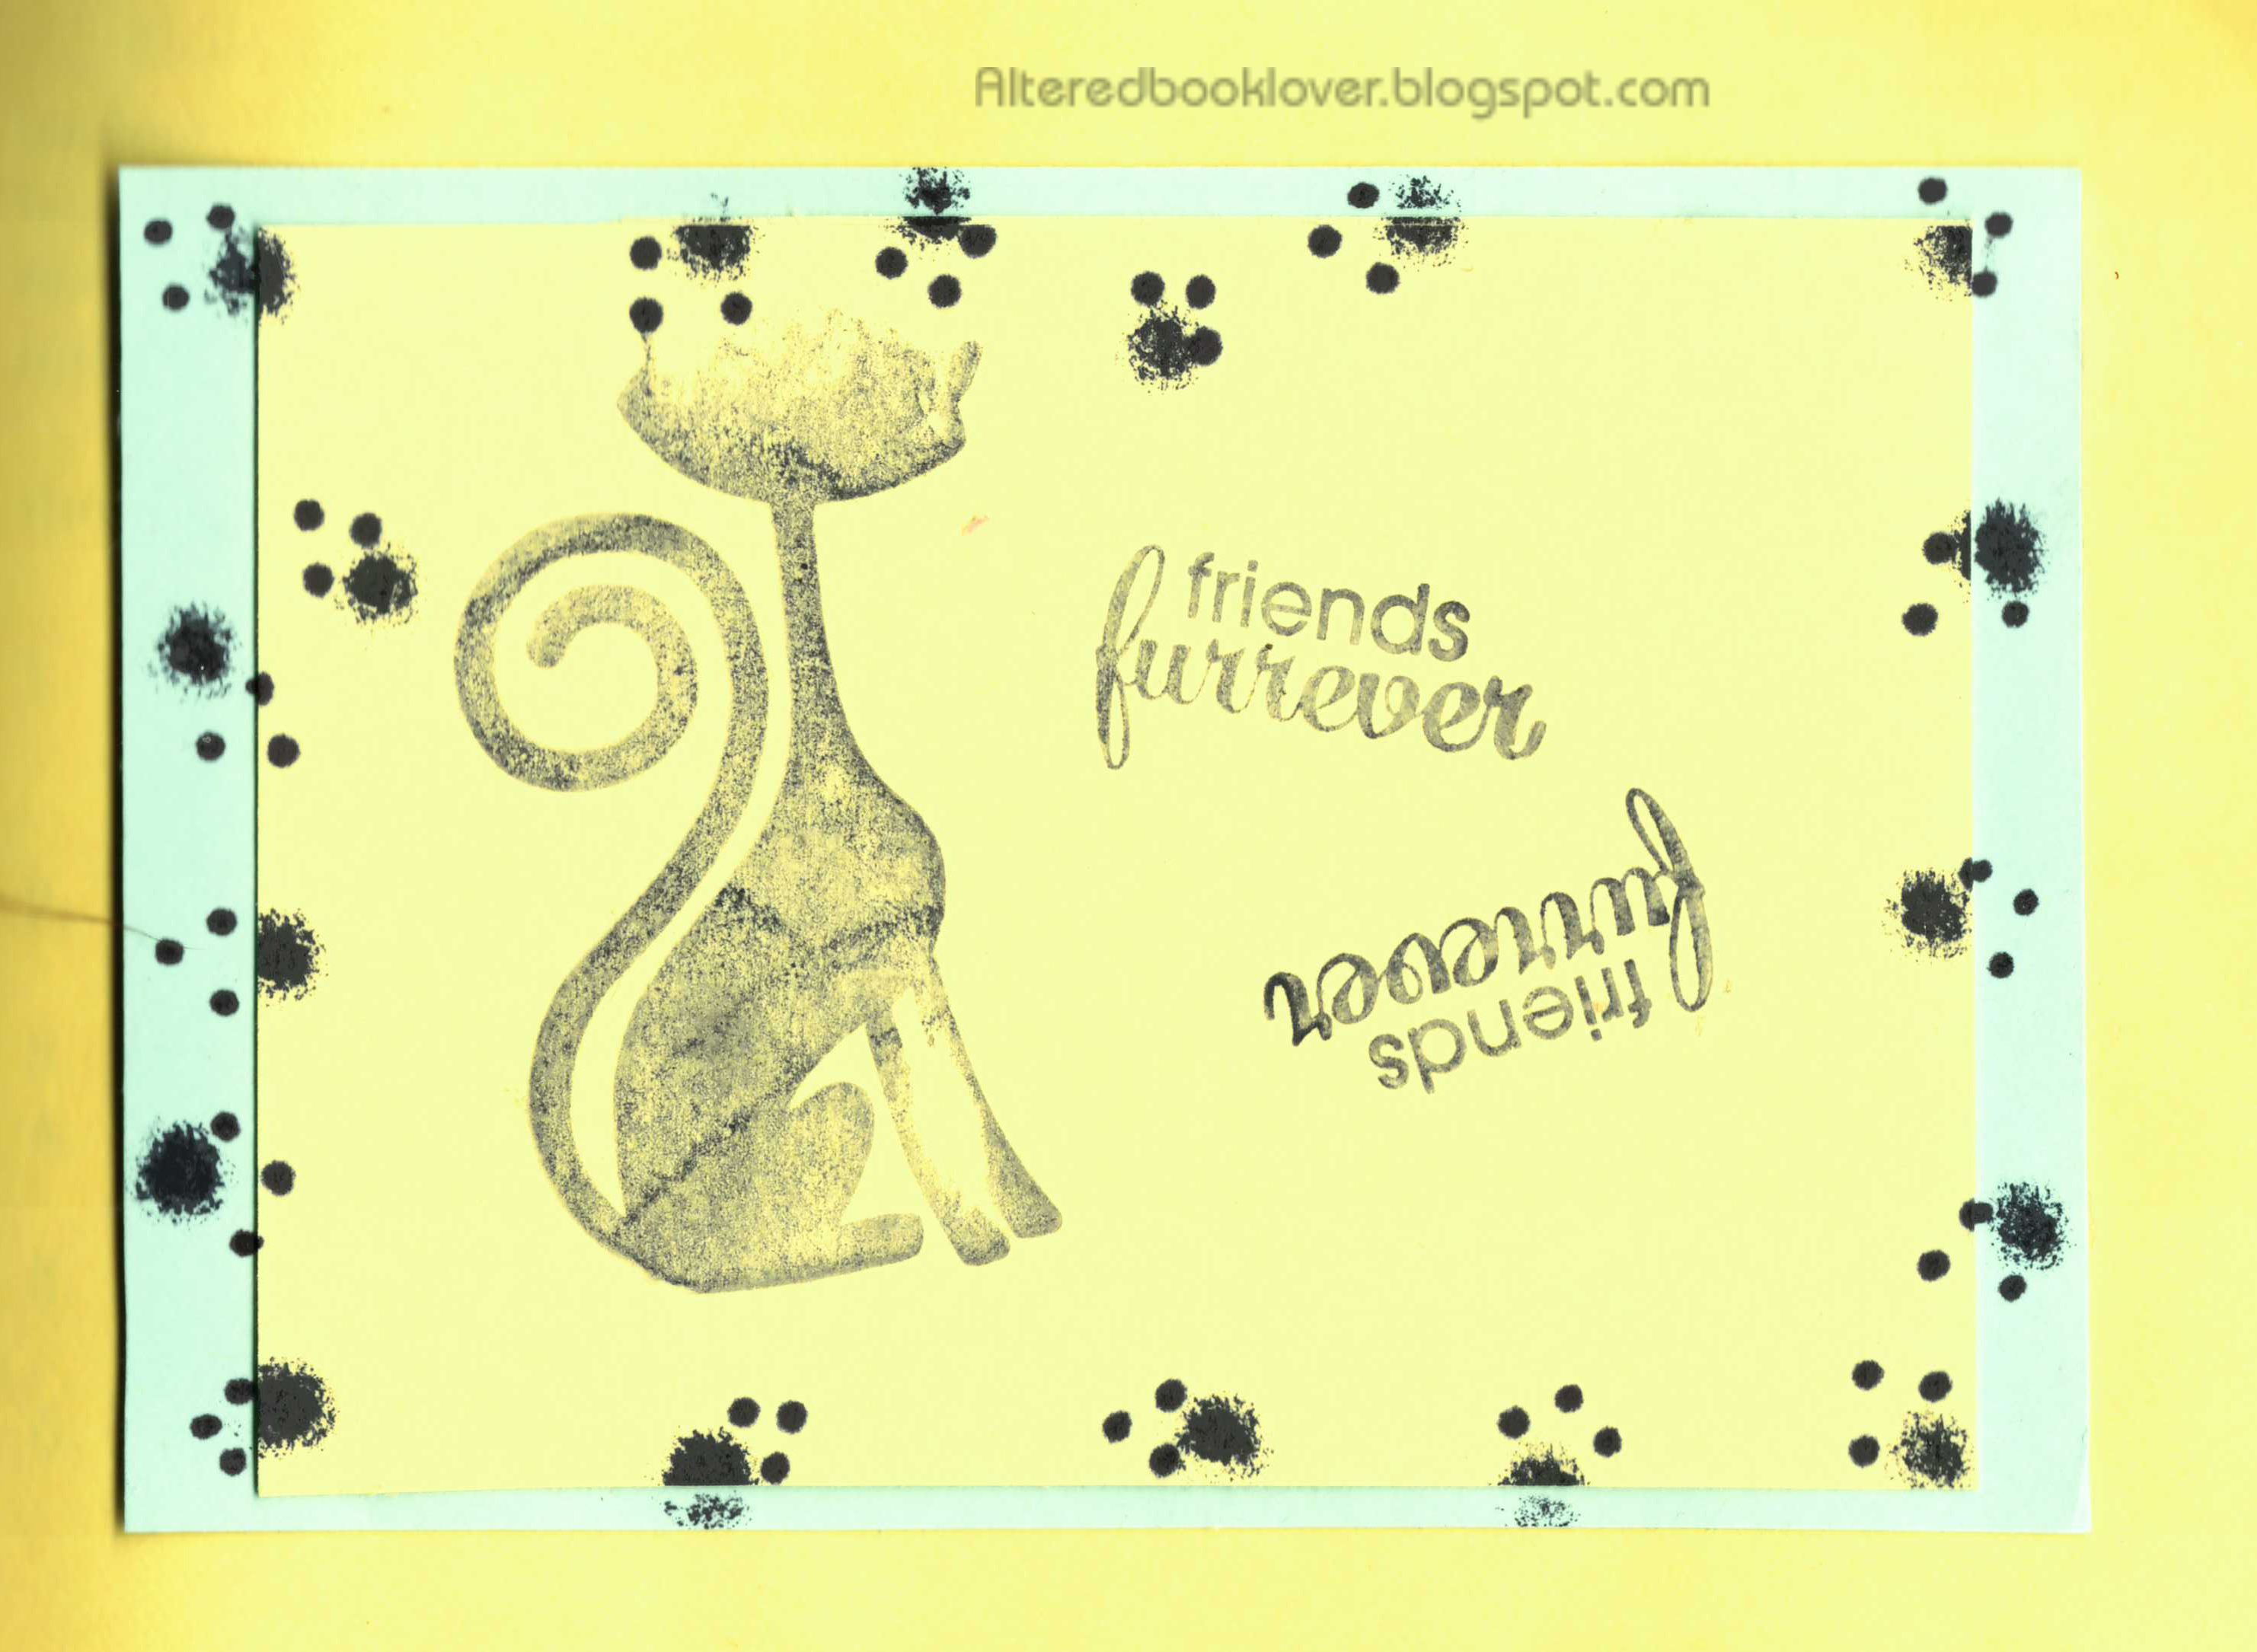
We'll begin with the calendar page taken from a recent calendar.  To that, I added a deconstructed bow from a different project and a button from my old blouse.

I had originally planned to sew large rick rack to the bottom of the page, but it hid too much of the lower area when I auditioned it.

For Day 16 of 22, I started with a page from a recent calendar, then added the bow and button. 
 
It's now time to share your own drink related post.  It can be photos, a place you visited, movies, postcards, books, sketches, mixed media, drawings, paintings, tags, scrapbooking, or other art that is digital, hybrid, or traditional, as long as it in some way relates back to a drink, any drink.  Using recycled materials is always a bonus in my world.  Regardless, please share below and Bleubeard and I, along with the rest of the T gang will be by to visit.   Please link only your T post and not your blog in general.  Old photos are acceptable because they may be taken any time, not just on Tuesday.   Please be sure to visit the other T Tuesday participants.  


Bleach Background


It's tax day in all the U.S.A., except Maine and Massachusetts who are celebrating Patriot's Day.  That's why they have until the 17th to file their taxes.  If you haven't filed by midnight tonight or requested an extension, the IRS will know!

Today we are creating a simple background technique that should be easy to complete and you should have most of the items needed for it.

Supplies (left to right, top to bottom)

Black card stock

Pale green copier/printer paper

Bleach

Water

Lid to hold bleach

Pumpkin foam stamp (purchased)

Tree foam stamp (purchased)

Select a soft or foam stamp to use in this technique.

Place a small amount of bleach in a container (mine was the lid to my water).
 
Dip stamp in bleach and transfer to paper.  I was a bit sloppy with my bleach.

After stamping, immediately soak stamp in water.

Black paper and bleach are a bit tricky.  I've seen items turn from gray to brown to red, depending on the black paper or fabric.

I may have gotten too much bleach on the stamp.

Definitely not my finest stamping.

I would say this is an epic fail, but I blame it on the cheap bleach I picked up at Dollar Tree.  It must have been old when I bought it.

Ruminations:
1.  Buy name brand bleach from the grocery store, not a store that carries a little bit of everything.

2.  Make sure your stamps are clean before you dip them in bleach.

3.  Don't over soak the stamps in bleach.  If necessary, remove some of the bleach before stamping your final project.

4.  Be prepared for surprises the first time you try this technique. 

Have fun with this very easy background or card technique.

This is Day 15 of 22 and I created a background that I consider a failure.  I guess they can't all be perfect the first (or every) time.


Sunday, April 14, 2024

Bring on the twinks


Do you mixed media artists remember when Twinkling H2Os were the rage a few years ago?  Did you indulge in buying a few?  I got mine on clearance and I used them a lot.  Then I put them away and forgot them.  Today I am pulling them out in order to create another background.  

Supplies from left to right, top to bottom

Twinkling H2Os

110 lb cardstock

Brushes (I used a flat 3/4 brush)

Dressmaker's tissues

Before I began the technique, I added distilled water to these H2Os so they would have a chance to go from solids to watery shimmers.  Be sure to use distilled water in case the H2Os aren't completely dry when you put them away.

I'm sure many of us know seamstresses who have old dressmaker's patterns they are willing to give away for the sake of art.

I added the three H2Os to the page using the flat brush.  I tried to allow the various H2Os to blend with each other in places, thus creating a new color. 
 
I color corrected this in PhotoShop.  I think it's a bit closer to the correct colors.  Too bad you can't see the mica that makes these so beautiful.  Allow your gorgeous piece to dry completely!

When completely dry, I drug out my matte gel medium and the dressmaker's tissues.

It's obviously still wet, but I love the results.  I will trim the edges when it's dry and scan it.

I fear the colors aren't as true as in the photo above, but it is still beautiful.

Ruminations:

1. I didn't get enough gel medium on the back of each tissue.  I found that out when I used what I thought was too much gel medium on the purple at the top.  I actually should have been adding more to all the tissues.

2.  I love how some of the lines of the tissues in back show through to the tissue on top.
 
This is Day 14 of 22 and I recycled some old dressmaker's tissues and got to play with my long forgotten Twinkling H2Os.


Saturday, April 13, 2024

Walk on the Wild Side


I've created a recycled spread in my Cats altered book today thanks to another tag I received in a tag swap a few years ago.

This is called "Walk on the Wild Side."  Detail shots are below.


The tag was created by a lady who I recently learned is no longer alive.  She also sent the spotted paper.  Since I'm driven by color, I found her "S" a bit jarring.  The cat, on the other hand, is really clever and well done.  I sewed the tag to the page.

For the top right side, I sewed bits I found in my stash to which I added four paw prints from a stencil.  For the gifted bottom right, I added the "laughter" rub-on that was mostly intact.  I also sewed this to the page.

This is Day 13 of 22 and I recycled a tag, a gifted added piece, and two disparate pieces of paper from my overflowing stash.


Friday, April 12, 2024

More tissue talk


Today I'm back with another background technique, this time with more tissue paper.

Supplies, left to right:

Large sheet of tissue paper (color of your choice)

Gold indoor/outdoor spray paint

Distress Ink (color of your choice)

Scrunch tissue paper, then unfold.  Scrunch as many times as it takes to get the desired effect for which you are going.

Smooth slightly, but leave various peaks and valleys.

Run your distress ink over the tissue.  When I tried to run the brown over the page, I found it was completely dry.  The only other color pad I had was called "Stormy Sky," which I feared might not show on the blue tissue.

I was pleasantly surprised to see how much darker the ink was than the tissue.  You can see it in the lower right side of the photo.

Spray gold paint loosely


in spots over the tissue.  You will probably need to iron the tissue before you adhere it to a background.

Ruminations:

1.  Once again, be sure your products are in working order before you begin your project.
2.  The key is to spray the paint lightly and only in a few spots.  That way the ink can show through.
3.  I suggest you iron the tissue from the back side before adhering it to any material.  Use a pressing sheet or parchment paper.
4.  Use these tissues in altered books, journal pages, or cards.  Cut to size needed.

This is Day 12 and I recycled tissue paper and repurposed spray paint.


Thursday, April 11, 2024

Love all creatures


I had intended this for April 11, but it published to March 7.  I have NO idea how that happened because I didn't even consider creating it till this month.  Thankfully only one person commented on it, so I am confident I can share it with FFO.

Bleubeard and I are calling this Love All Creatures.  I'm sharing it with Nicole's Friday Face Off.  Details below.


For the left side of the spread, I did fairly well.  I ran into trouble when I started stamping the backgrounds on the right side.

I was in a tag swap a few years ago and this participant also sent an extra blank piece that matched the background of the tag.  The other two pieces were also originally blank and I found them in my stash.  I honestly do NOT stamp well and I didn't have a way to see the "Friends Furrever" stamp was upside down until after I had stamped it.  The same with the "You're purrfect" stamp, which I stamped too high on the card.  As a result, I added the heart.

This is Day 11 of 22 and I recycled a tag and a blank piece I received in a swap.


Wednesday, April 10, 2024

Metal meets a witch


Today I'm back with another background technique. I'm sure some of you will have the needed supplies to complete this background. 


Supplies from left to right and top to bottom:

Heat tool (alternative is a hair dryer, which doesn't get as hot)

Cardstock, 110 lb, one for each page you wish to create

Metallic glazes (I chose copper and pearl)

Wonder Under sheet by Pellon, or Stitch Witchery (regular or heavy weight) by Dritz

I began by laying some metallic glaze on the cardstock using an old used gift card.  The pearl glaze was completely dry and hard and had to go to the trash.

Once I thought the glaze had dried, 

I laid bits of Stitch Witchery on the page.  Of course, I was a total fool.  When I ran the heat tool over the page, the bits of Stitch Witchery flew in all directions.  I still can't find the tiny bits because they are quite transparent.

I found I was unable to hold small bits of Stitch Witchery while attempting to heat and melt it.  In the end, I had to use long strips.  Although this is a fabulous technique, I believe I should have used the Wonder Under sheet instead.

Ruminations:

1. Check your supplies before you begin.  That way you won't be surprised when you are in the middle of creating your backgroumd.

2.  If you don't have a metallic glaze, you can substitute metallic acrylic paints.

3.  I sincerely suggest you use a sheet of Wonder Under.  It will still give you the lacy pattern, but won't look like strips of lace.

This is Day 10 of 22 and I shared a background technique I think most mixed media artists who sew will try.